Posts

Showing posts with the label Liberty Tana Lawn

Starting my Garden of Forgetfulness Quilt

Image
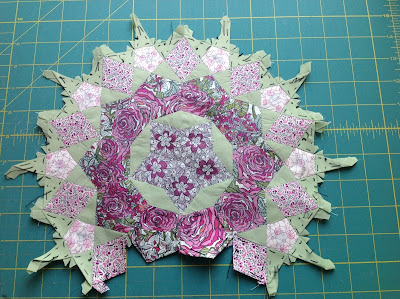
I am Having  fun working on the flowers for my Garden of Forgetfulness quilt. They are all made from Liberty Tana Lawn prints in several shades of pink. There are a lot of pink roses in there! My finished La Pass top still needs a backing fabric, so I am working on this new project while trying to decide which fabric I will use. This quilt is from Willyne Hammerstein's book Millefiori Quilts 2 . 

La Passacaglia Top Finished!

Image
Woo hoo! this was a LOT of hand piecing.  I am remiss in my blogging. My La Pass quilt top is complete. Now I need to decide on the backing fabric and get 'er done. Here she is...

New Large Rosette Underway

Image
After looking at the large rosettes for this project, I decided that one of them did not go well with the others. My black and pink attempt to do an outer flower ring was a little bit blah compared to its three siblings so I ripped off the outer ring in preparation for using this as one of my smaller rosettes in the quilt. Then it was time to find some new Liberty Tana Lawn prints for the large rosette, so I went for the flowers! There are some sailboats and rabbits thrown in there for good measure. The rabbits are the small hexagon in the first ring of stars. Here is the new large rosette in progress. As always, the center of the rosette consists of the little creepy Cranford faces. I think I have just enough of this fabric to use in all of my rosettes, then it will be gone for good. Happy quilting! Susan

Completed More La Passacaglia Rosettes

Image
I have been playing catch-up with my La Passacaglia quilt rosettes after a summer of getting behind schedule with just about everything. All of my Liberty Tana Lawn fabric now lives in about 10 small bins, which makes it much easier to pick and choose which fabric to use. I have completed the bottom right quadrant of my quilt and joined the pieces. Here is that large, lower piece of the quilt, have a look! The next part I am working on is the lower right part of the quilt.  My plan is to put my completed tana lawn roses large rosette there and then surround it with smaller blocks.  Here is how that one plus the hot pink ladies looks with what I have already completed. Here are a few small rosettes that may find a home around those roses or may hang around and be placed in the top half of the quilt. We shall see! I really love this project.  I have acquired some very strange calluses on my hands from all this hand piecing/basting and hand st...

Some La Passacaglia Rosettes Ready to Rock and Roll

Image
I have a lot of rosettes ready to be organized so I thought I would do a photo show in my post today!  Right now, there is only one large rosette with three smaller pieces attached: The other three large rosettes are ready as well. Then there are some smaller rosettes awaiting placement. I have several more smaller rosettes that are partially finished as I wait to see what I need where. Such a fun project! Susan

A Few More Small Rosettes for La Passacaglia

Image
It has been a long summer of feeling under the weather and not sewing as much as I would like.  However, things are improving and I am starting to once again work on the rosettes for my La Passacaglia quilt made from Liberty Tana Lawn fabrics. The four large rosettes are complete and I am sewing my way through the numerous smaller rosettes that will surround them in the finished quilt. Here are two completed and very different small rosettes from the past few weeks: With luck I will have enough of the Cranford fabric to complete all of the centers.  I am out of the grey and the brown Cranford now, but have hot pink, dark purple and light pink fabric remaining. There is something about those little faces that delights me.  They look like little ghosts in strange bonnets making faces at you, don’t you think?  Or is it a “Queen Victoria” thing? Happy quilting! Susan

Roses for Last La Passacaglia Large Rosette!

Image
Roses are the theme for the fourth and final large rosette in my La Passacaglia quilt, what fun! Liberty Tana Lawn has some gorgeous rose fabrics to choose from. I went with classics in red, blue, purple and hot pink this time around. What do you think? I still need to finish the last half row of stars so stay tuned...

Another Large Rosette for La Passacaglia!

Image
This is a time-consuming but fun project.  I am a slow quilter using my sewing machine, which means that I move at a snail’s pace sewing by hand. Here is my third of the four large rosettes for La Passacaglia.  I wanted to make flowers in the outer border at least once, and this is the result. Liberty Tana Lawn is a dream to hand piece with and the range of fabric colors and patterns is awesome indeed. Happy Quilting! Susan

Red and Blue La Passacaglia Rosette is Complete

Image
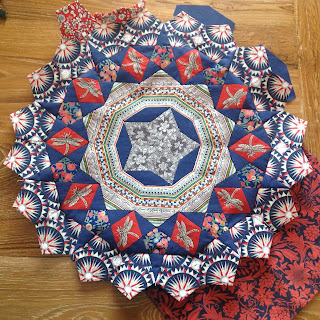
Finished my second large rosette for La Passacaglia, hooray! I had fun with the red and blue fabrics. My favorite piece might be the little skiers in the outermost stars. Or the dragonflies. The butterflies. Or the little Cranford faces in the middle... guess I can't decide. Happy quilting and Merry Christmas! Suspect

Red and Blue La Passacaglia Rosette and a T-Shirt Quilt

Image
Well, I am having fun working on my La Passacaglia rosettes.  Progress is slow and steady. Here is a picture of the big rosette in reds and blues that I am building now. I also recently finished a T-shirt quilt, have a look. Learned some new skills for stabilizing knit fabrics, too fun. Happy quilting!  Susan

Almost Thanksgiving: La Passacaglia Update

Image
My goodness, are my fingertips sore from all of the hand stitching.  I have not found a device that works for me to protect my fingertips while sewing by hand, although I seem to be getting a bit more coordinated over time.  I have finished my first large rosette, woo hoo! There is one small rosette (see my previous post for a photo), a second small partial rosette that is pretty cute and this big beauty. My next Tana Lawn rosette is going to be mainly navy and red, which is quite a color change from the rosettes I have done so far.  We shall see where those new colors lead me. Happy quilting! Susan

Caught the La Passacaglia Fever!

Image
Time for some hand piecing! When I saw the cover of Willyne Hammerstein's Millefiori Quilts , I just had to make one of my own. My La Passacaglia quilt is going to be composed of 100% Liberty Tana Lawn pieces. This should be a great way to use up some of my Tana Lawn scrap fabric collection. The rosette centers will all be made from Grayson Perry Cranford in several colors. I love those little faces in the bonnets. Some centers will be pink, some will be purple, some will be brown and some will be grey. If I had the other colors, I would use them as well.  Unfortunately, I do not have them and they are pretty much impossible to find now. I have finished my first small rosette. Here it is in its first close up... And here it is from a distance... Oh my goodness, what a lengthy project this will be. What do you think? Happy quilting! Susan

Quilting Sidetrack: Dish Towels

Image
Recently, I decided to make some patchwork dish towels as my contribution to our local quilting guild craft show table. I used prewashed and pre-shrunk white Huck surgical towels as the base. Some of the patchwork is Liberty Tana Lawn hexagons. Other towels are made with some Heather Ross Mendocino scraps. There are some Christmas reds and greens in the Tana Lawn striped versions as well. They certainly make my work table look pretty, don't you think? Susan

Tana Lawn Grey Quilt Piecing Complete!

Image
I think I am the world's slowest quilter.  However, I am happy to report that I finished the back of my Tana Lawn string quilt and it is ready to be sandwiched and quilted. Here are my final pictures of the quilt front and back.  The back has all of the extra squares I did not use for the front.  Some of them had fabrics I wasn't quite so fond of, and some of the blocks on the back of the quilt were just left over for no good reason at all. So, here is the front of the quilt... who knew Liberty Tana Lawn came in so many shades of grey? And here is the back of the quilt.  I used a solid grey Tana Lawn for some of the pieces on the back, but there are no solid pieces anywhere on the front of this quilt!  I will package up the quilt front and back and send them off to Jennet at Icepurplepenguin .  She uses her long-arm quilter to my advantage when she finishes these monster quilts for me. Well, it's back to piecing the Echino wonky star quilt fron...

Tana Lawn Quilt: Putting the Pieces Together

Image
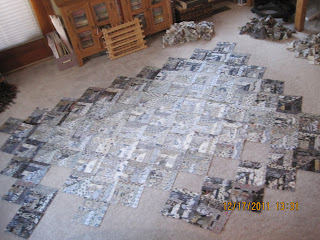
It's always fun to have enough blocks to play with.  I randomly laid the completed blocks out just to see what the quilt might look like one day.  It looked pretty interesting although I am still missing some pieced squares around the edges.  The dark edge will be completed with half triangles all around the edge of what you see here.  I haven't pieced those guys yet! I need to decide if I am going to enlarge this pattern a bit or perhaps get creative with the edging and binding to add a bit more size in the end. Here's a close look at the shading effect, which is the key element of this very grey quilt! I am really pleased with how the Liberty Tana Lawn greys shade from light on the inside to the much darker border. The medium shades were the hardest ones to come by and I think a few more medium tones might have added a bit more contrast to the gradual fade. I am happy with this project so far, now it's back to piecing more blocks and deciding what, if an...

Latest Project: Liberty Tana Lawn String Quilt in Greys

Image
Hello everyone!  Sorry I've been away from my quilting blog, but I'm BACK now! I am currently piecing a new quilt that I plan to keep for myself.  It is a string quilt in Liberty Tana Lawn fabric.  I am using mainly grey colors, light to dark, with a little black in there but not much. I started with three piles of strips - light, medium and dark.  Here is the dark pile of Tana Lawn strips. It's even beautiful when it's all jumbled together in strips! I am planning to piece the quilt so that it goes from light colors in the center through light/medium blocks to medium blocks to medium/dark blocks and dark blocks around the edges. Here are the color gradations so far.  They go from dark to light heading left to right, with the transition blocks (dark/medium and medium/light) in the front.  My fabric strips range from 1 1/4 inches to 2 1/2 inches in width. My goodness, this has been a LOT of work! The blocks are coming out quite nicely....